
Available in Enterprise
In this article:
- Introduction
- Preparations
- Step 1: Connect a custom domain to your publication
- Step 2: Configure the publication domain in the Data Stream
- Step 3: Import and configure the Google Tag Manager container settings
- Step 4: Add custom dimensions to Google Analytics
- Step 5: Test the connection
Introduction
This article describes how to connect Google Analytics using Google Tag Manager to start tracking your online publications. Following these instructions will have the online publications tracked in the same Data stream that is tracking your website. This cross-domain configuration is recommended by Google as it helps preserve user journeys. It also supports building catalog-specific audiences to understand how online publications drive conversion and leverage GA4's predictive insights.
Preparations
To enable installing tags onto your publications, make sure to connect Google Tag Manager to Publitas, reusing the container that already contains the website's Google Analytics integration.
Step 1: Connect a custom domain to your publications (embed only)
For Google Analytics to track online publications, when they're embedded on your site, the publications need to exist on the same domain as the website's domain.
Make sure to update any existing embed codes on your website using the new embed codes, available in the Publitas app once a custom domain is connected.
Click here to learn more about connecting a custom domain to your publications.
Step 2: Configure the publication domain in the Data Stream
- In Google Analytics, locate the property in the Admin section and select Data streams
- Click on the data stream for web and go to Configure tag settings near the bottom
- Select Configure your domains and add a condition where the domain exactly matches view.publitas.com or your custom publication domain
Step 3: Import and configure the Google Tag Manager container settings
Recording custom events requires custom data. Publitas uses the data layer to feed Google Tag Manager the necessary data. Follow the steps below to import the variables, triggers and tags necessary to obtain and record the data in Google Analytics.
Importing the preset
- Download the container file here
- In Google Tag Manager, go to the container's Admin section
- Select Import Container and choose the downloaded file from your computer
- Select the desired workspace
- Merge the selected workspace with the content of the imported container, select Rename conflicting tags, triggers, and variables, and click Confirm
- Go to the Tags section and connect both new tags to the website's Measurement ID.
- GA4 - Publitas Virtual Pageview tracking
- GA4 - Publitas Event tracking
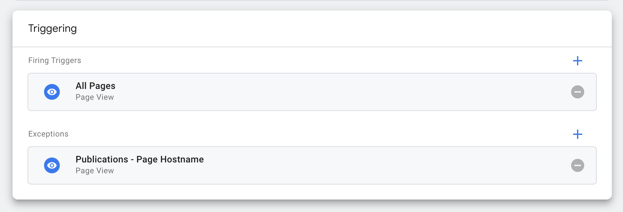
Exclude existing tags from firing on publications too
Your container may already have several Tags set up to fire on All Pages. When connecting the same container to Publitas, these Tags will likely also fire on on all pages of the publications. If this is not necessary or maybe even unwanted, you update these Tags to not trigger on the publication domain.
- Locate the new trigger, called Page Hostname - Publication domain
- If you're using a custom domain, update this trigger by replacing view.publitas.com with your custom domain
- Add this trigger as an exception to the tags that you don't want firing on the publications, for example the Tags that employ the All Pages trigger.
Make publication tracking conditional on user consent
If you're using Google Tag Manager to make your tracking solutions conditional on user consent, you might be able to apply the same solution to the new tags for tracking your online publications, since the publications are managed within the same container and hosted on the same domain as the website is.
Step 4: Add custom dimensions to Google Analytics
IMPORTANT: Make sure to disable automatic translation of this page
before completing this step.
Out of the box, all custom events are recorded by Google Analytics. Each event contains a set of event parameters to support advanced filtering of data in reports and dashboards. To record the event parameters as well, you'll need to add them as custom dimensions in Google Analytics.
In Google Analytics, go to Admin > Custom Definitions to create the following set of custom dimensions:
| Dimension name | Event parameter | Scope |
| Publitas Collection Name | pbl_collection | Event |
| Publitas Event Action | pbl_action | Event |
| Publitas Event Value | pbl_value | Event |
| Publitas Group Name | pbl_group | Event |
| Publitas Page Number | pbl_page | Event |
| Publitas Product ID | pbl_product_id | Event |
| Publitas Product Title | pbl_product_title | Event |
| Publitas Publication Name | pbl_publication | Event |

![]()
Step 5: Test the connection
Once the setup is completed, your publications will be tracked by Google Analytics. To verify that data is coming in correctly:
- In Google Tag Manager, load any publication that should be tracked by Google Analytics in preview mode (for embedded publications, this does not work if the changes aren't live)
- In Google Analytics, go to Admin > DebugView and look for the events coming in when you browse through and interact with the publication
DebugView in Google Analytics:
Check out all events and parameters recorded for online publications