
Publitas can automatically tag the SKUs it detects in your publications. It does so by scanning the pages and looking for matches with the SKUs in your product feed. For every match, a Product hotspot is created on top of the corresponding SKU. In this article:
- Prerequisites
- How to automatically tag SKUs
- Auto-tag SKUs when uploading a new PDF
- (Re)Run auto-tagging in the hotspot editor
- Adjusting the hotspot size and positioning the hotspot icons
Prerequisites
To use the Auto-tag SKUs feature, you need to:
- Import your product data by connecting your product feed to Publitas
- Store the SKUs in the product feed:
- XML: Store the SKUs in the <g:id> attribute
- TSV: Store the SKUs in the id column - Add the SKUs to the pages of your publication in a way that they can be indexed (Find out more about indexable content here)
- Per product, the SKU in both the product feed and the PDF needs to be identical
TIP: Avoid appending additional characters to the SKU in the PDF, like a dot, comma or parenthesis
How to automatically tag SKUs
Auto-tag SKUs when uploading a new PDF
If your collection of products does not change very often you can enable auto-tagging as soon as upload the publication to Publitas. It will automatically create Product hotspots based on matching SKUs. You can additionally choose if icons should be shown for each hotspot or not.
Locating the auto-tagging option when uploading a new PDF:
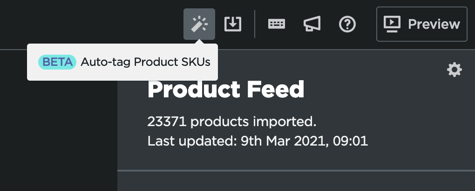
(Re)Run auto-tagging in the hotspot editor
Use the option in the editor, located in the upper left corner, to apply auto-tagging to your publication if you haven't done so already when creating the publication.
Locating the auto-tagging option when uploading a new PDF:
This option can also be used if you have already run auto-tagging before, but your feed has since been updated to include the SKUs that were missing before. Publitas will then only add product hotspots to the SKUs that don’t already have product hotspots associated with them. You can additionally choose if icons should be shown for each hotspot or not.
